- Design Phase: Quick Summary
12. The Final Design – An accurate, to-scale drawing of the final design. Determine the exact size, shape and location of all Elements decided upon during the creation of the Schematic Design Map. Demonstrate or explain five permaculture principles and how they fit into the design.
- The Final Design Map – Accomplished through several overlays or a big piece of paper. Be sure to include the design of the systems for water supply, roads, paths, structures, vegetation, and animal husbandry. Intermingle highlights of the Final Design throughout the entire presentation.
13. Phases of implementation – (1 – 2 years, 3 – 5 years, 6 – 10 years, 10 – 25 year plan)
- Phases of Implementation Document – A written document explaining how the design will evolve over time. This may include planting strategies for a sequential installation, succession pathways for different phases, the evolution of construction projects, etc. It must include the human element of guilds. Who is going to take care of this design after it is implemented?
14. Practice Presentations
This greatly enhances the overall learning process and improves the quality of a presentation. Consider timing and transitions between speakers as well as defining member roles for the presentation.
15. Design Project Presentations- come dressed appropriately for delivering a professional design to your client and your peers and instructors. Feedback will be given on both the design and presentation itself.
The presentation format is:
Introduction (10 minutes) – Introduce your design group and orient the audience to the initial site by using the base map and other analysis tools. Then present an overview of the design that your team has created by unveiling your final design map. Please use the language of design principles and patterns to explain the design accurately.
Body (5 minutes per person) – Each team member presents a detailed design pointing out key design challenges and explaining how 3 permaculture principles have been creatively applied.
Conclusion (5 minutes) – Close the presentation with the phases of implementation and management plan.
Final Design Project Documentation Checklist
- Base Map
- Sector Analysis Overlay
- Analysis of Flow Overlay
- Elements & Functions Mind Map
- Schematic Design Map
- Habitat Defining Species List
- Project Detail Designs Visuals
- Final Design Map
- Phases of Implementation Document
Observe. Analyze. Design. Make the connections.
Design Phase: Detailed Description and Examples
With all the preparation of the four previous steps, the design should naturally unfold in a simple manner. By understanding the patterns of the landscape, one can achieve a design that is regenerative in nature, meeting the prime directives of Permaculture, and fulfilling of the vision of the client. This phase will include a big picture design, finalizing the patch designs, how the plan will be implemented and evaluated, and then the presentation to your client and peers. The design relies heavily on the both the process you have followed and the design principles themselves. I want to see more about how the principles are being displayed than just a bunch of cool elements. They must interrelate, be placed so they fulfill multiple functions, so energy cycling is happening, and on and on.
12. The Final Design – An accurate, to-scale drawing of the final design. Determine the exact size, shape and location of all Elements decided upon during the creation of the Schematic Design Map. Demonstrate or explain five permaculture principles and how they fit into the design.
- The Final Design Map – Accomplished through several overlays or a big piece of paper. Be sure to include the design of the systems for water supply, roads, paths, structures, vegetation, and animal husbandry. Intermingle highlights of the Final Design throughout the entire presentation.

Base Map with final design overlay
Remember form over function. Make it pretty but legible. Don’t overdue it with detail for this project. If going deeper do but much of the drawing will stay at the schematic phase. Details are given in the design detail and clients needs will determine how much of that the design requires.
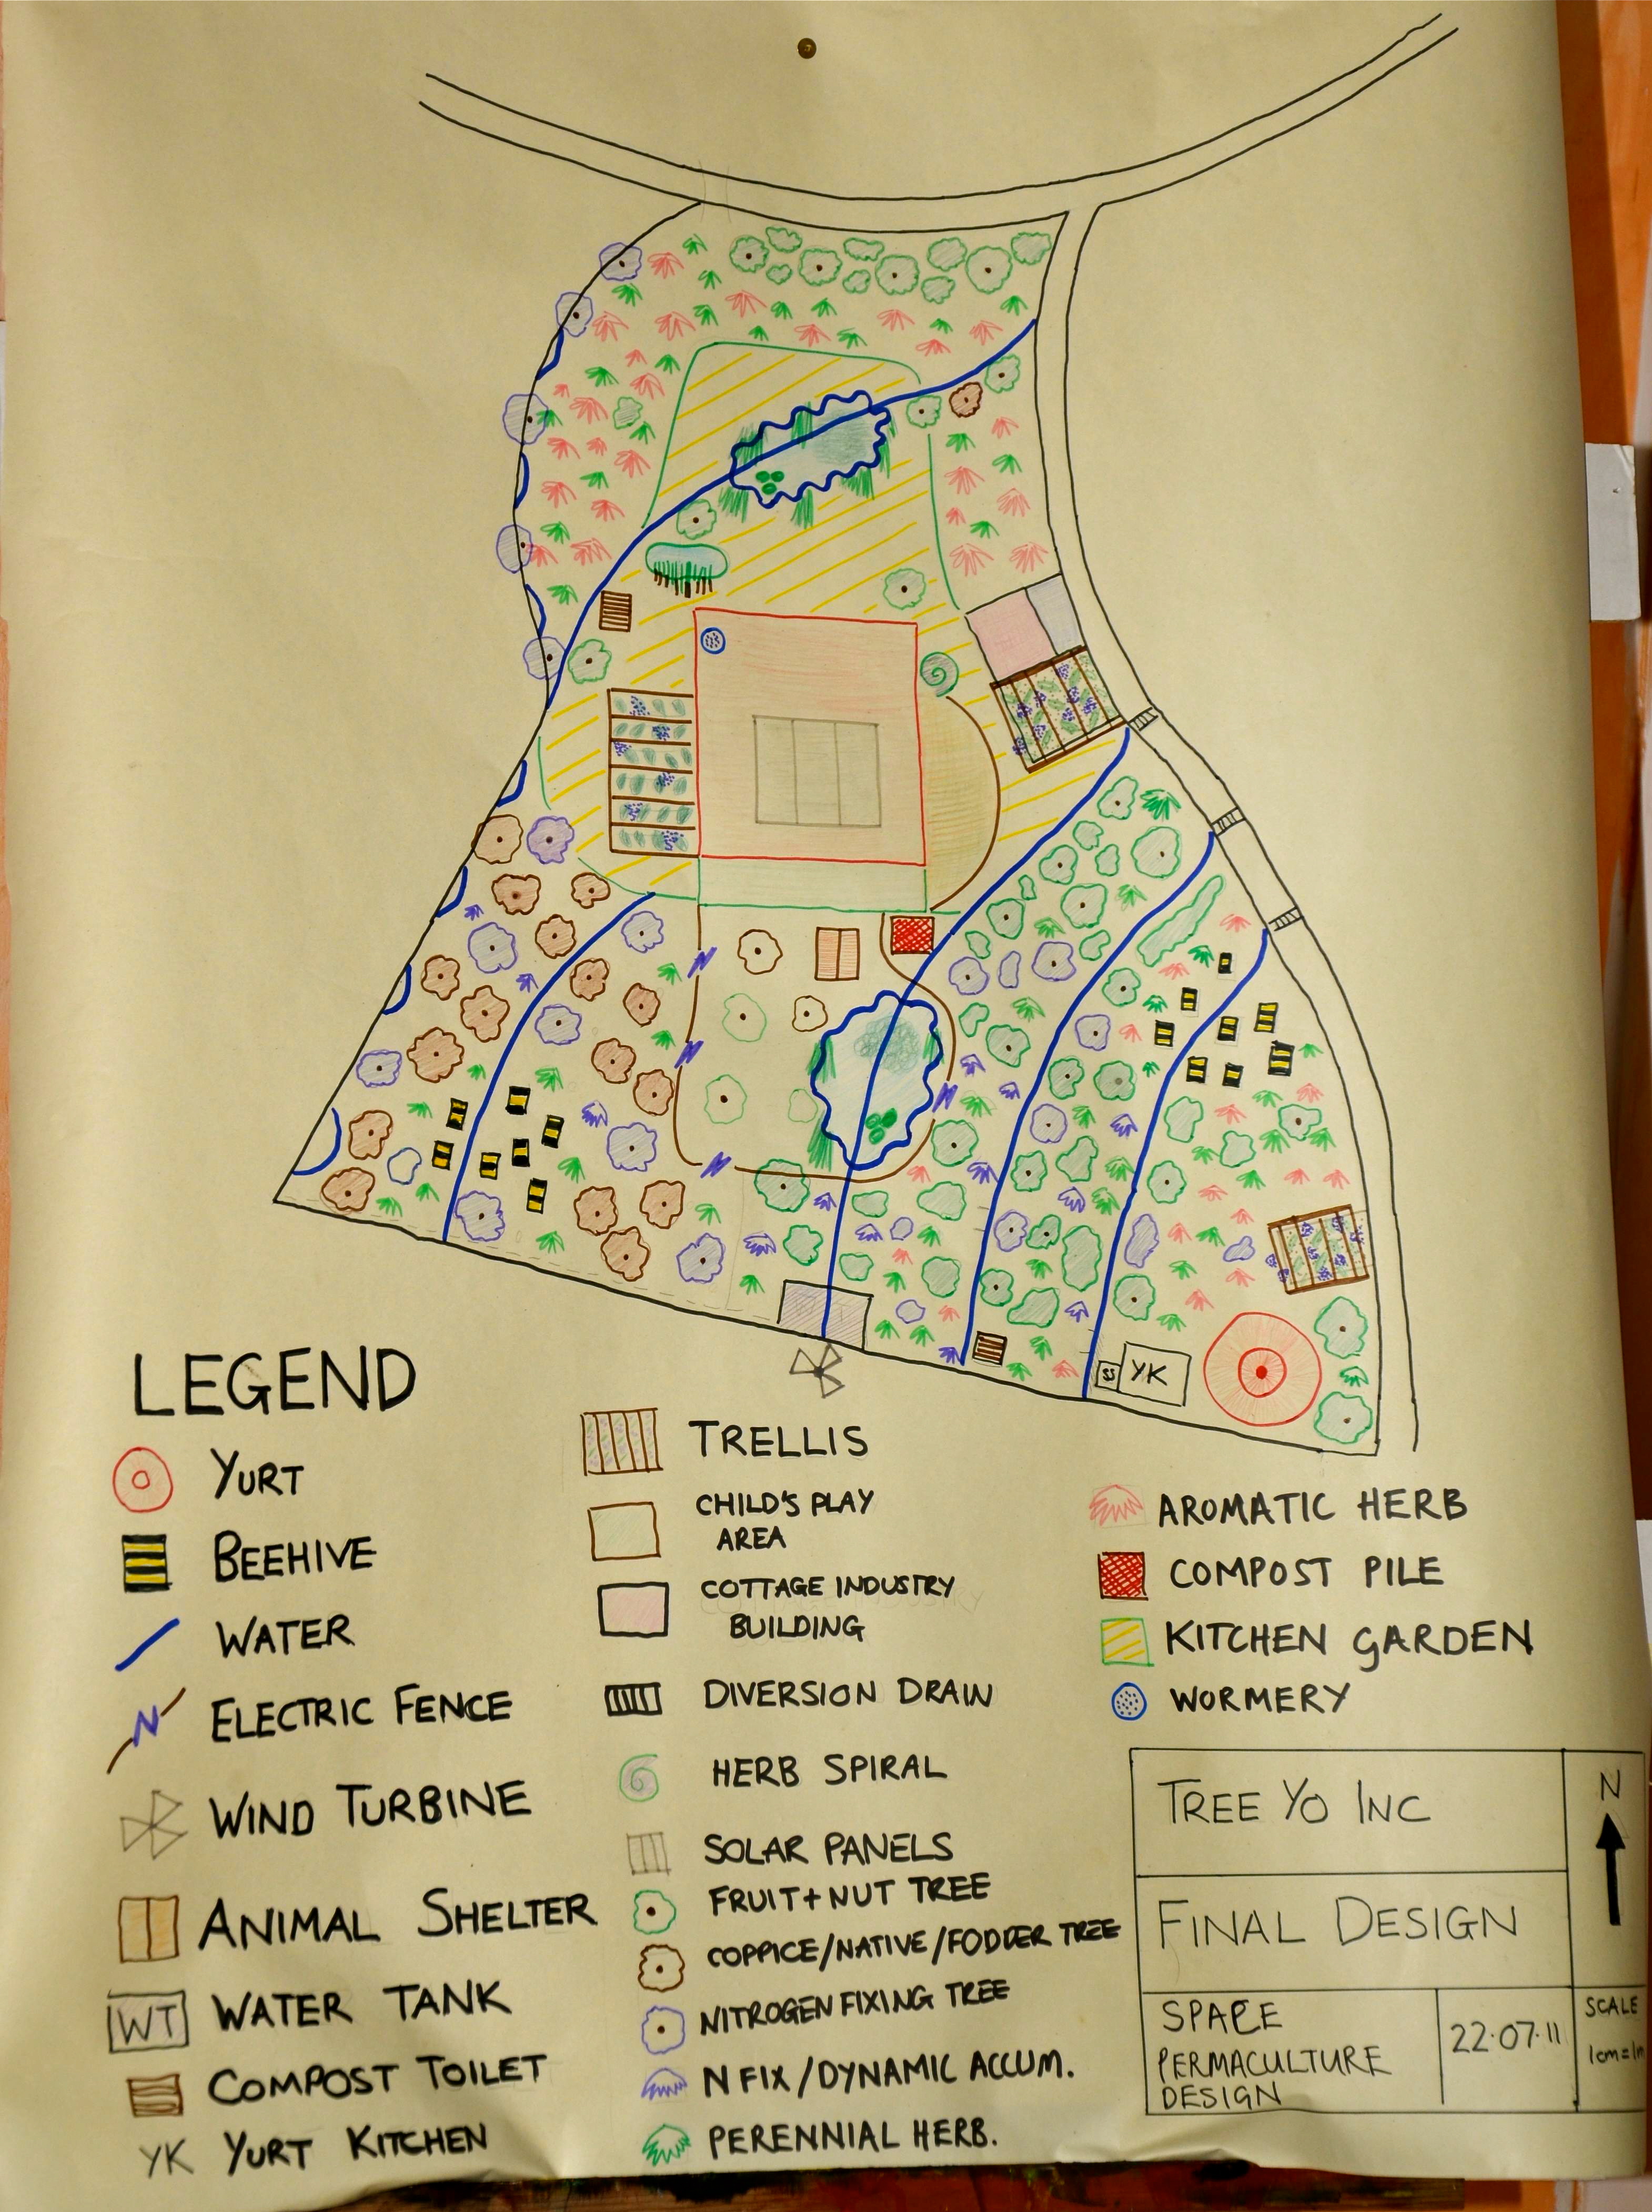
Final Design map from Portugal
Design Drawings Guidance:
- I am not looking for artistic renderings rather the use of scale and the research that goes behind that
- I am looking mainly at how you used the principles of PC to lay out your site, focus most on this
- Your assessment phase sets the stage for energy efficient planning– i.e. zones, sectors, and slopes and energy cycling amongst others- have you dealth with issues around wild energies, flows, and landforms?
- relative location helps to create functional interconnections, are elements placed accordingly?
- are your important functions supported by many elements building resilience into your site?
- are your elements preforming many functions building redundancy into the site?
- Are you supporting your site with biological resources– i.e- animal tractors, IPM, and fertilization- NFT’s and DA’s?
- Are you using time and plant stacking in your small scale intensive systems to develop nucleus and radiate outwardly?
- Are you using diversity to create a balanced cultivated ecology full of guilds that are assisting in pest control, providing physical shelter, providing nutrients, and reducing root competition?
- Are you cycling energy, making sure we have a zig zag approach to source to sink rahter than a linear exit of energy?
- Are you accelerating succession and evolution through using NFT’s, Swales, composting, working with invasive’s?
- Are you incorporating the principles of edge so a net and sieve for energy can be put in place?
- Are you turning problems into solutions?
- Are you cooperating not competing?
- Are you working with nature, not against?
- Are you perpetuating the fact that Everything Gardens?
- Are you ensuring that the yield is theoretically unlimited, only our imagination and information limit us.
13. Phases of implementation – (1 – 2 years, 3 – 5 years, 6 – 10 years, 10 – 25 year plan)
- Phases of Implementation Document – A written document explaining how the design will evolve over time. This may include planting strategies for a sequential installation, succession pathways for different phases, the evolution of construction projects, etc. It must include the human element of guilds. Who is going to take care of this design after it is implemented?
-
Beginning phases will focus on install while later phases will focus on harvest and management. See the evolution which ties to the social and economic sustainability of the site.
-
Phases of implementation Expectations:This is a very important piece of any design because it all can’t be developed in year 1 because of labor and finances. Thus you will want to describe the succession of the site and how some of those community resources that were described earlier will be brought in. This also ties into expected yileds because a client might not know when a chestnut will produce. In that sense though, only focus on main speceis especially those that the client wanted.An important piece is that some sites will require a windbreak before the fruit trees will survive the Iowa winds. Or certain trees may need soil perp down for a year or two before in the form of keyline or compost before they would ever thrive. This is where the functional analysis comes in and requires you to set the conditions for abundance. This will anchor the conclusion of the presentation.
Example of Phases:
PHASES OF IMPLEMENTATION: 1- 2 years
- Build yurt
- Build compost toilets
- Build wind turbine/s
- Build greenhouse
- Build herb spirals
- Introduce chickens and guinea fowls
- Build beehive box and introduce bees
- Plant coppice woodlot
- Plant windbreak
- Build gabions
- Plant nitrogen fixing trees for the food forest
- Build trellis for vineyard and plant grapes and hardy kiwi
- Plant nitrogen fixing plants for fruit orchard
- Plant aquaculture pond plant species
- Build water catchment systems for the house and garage
- Plant banana circle for outdoor shower
- Plant berry bushes/hedgerow berry bushes
- Create compost piles
- Build duck island, introduce ducks
- Start to add fencing (starting with goat free-range area)
- Plant timber lot
PHASES OF IMPLEMENTATION 3 – 5 years:
- Rebuild main house
- Install passive solar panels on main house
- Plant remaining fruit orchard species
- Introduce goats
- Windbreak will begin to be ideal height
- Prepare and plant community garden
- Ponds are created by gabions
- Plant remaining food forest species
- Build sauna with wood from the timber lot and coppice wood lots
- Build gazebo
- Build bat house
- Build hawk perch
- Finish fencing
- Begin to harvest black locust
- Construct water catchment systems for the yurt, barn, and greenhouse
- Goat dairy
- Begin constructed wetlands
- Begin annual prairie burns
6 – 10 years:
- Begin to harvest wild black cherry trees
- Prepare and plant three sisters lot
- Use ponds behind gabion for aquaculture
- Build amphitheater
- Finish constructed wetlands
- Maintanence of pond, gabion, swale
- Mainanence of tools/equipment
10 – 25 years:
- Harvest bur oak
14. Practice Presentations
- This greatly enhances the overall learning process and improves the quality of a presentation. Timing is worked out and transitions between speakers smoothed and roles defined for the presentation.
Time yourselves and figure out how the presentation will unfold. Things to monitor are the following:
- lead-in and intro articulates the basic of the client needs and site analysis
- transitions between speakers
- effectiveness of visuals (have the presentation loaded on the computer and test it out or figure out how you will go from overlay to overlay)
- patch design drawings or visuals that communicate effectively.
- timing, does the intro last 5 minutes, do the patch designs last 5 minutes……
Please, please, please do this step. Plan accordingly, it will take about an hour to do, so please don’t leave this to the last minute where you end up letting it slide. - MAKE SURE ALL VISUAL AIDS ARE VISIBLE, LEGIBLE, AND COMMUNICATE DESIGN BOTH PHYSICALLY AND ON POWERPOINT

15. Design Project Presentations- come dressed appropriately for delivering a professional design to your client and your peers and instructors. Feedback will be given on both the design and presentation itself.
- Dress nicely, Sunday’s finest so to speak please, this is a professional presentation.
- Introduce yourselves accordingly arrange yourselves so there is comfortable viewing for all in the audience.
- Lead us through your introduction of the vision and assessment phase in 5 minutes time.
- Smoothly transition between speakers and visual aids.
- Tell us about your overall design which may include the process to get there with the schematic drawing.
- In this design part, try to use the principles seamlessly in your verbiage. Don’t force it, rather let me know of your understanding of WHY you were putting what you did where. More interested in the WHY than anything else in this phase.
- Communicate about the overall design elements and have that lead-into your patch designs.
- Transition between speakers with one person concluding and another taking over with the first speaker saying, “and now Vinny will speak about the energy side of the design through the wind turbines we intend to install”.
- Each person will deliver their patch designs using effective visuals that you have drawn or pulled off the internet. I am looking for accuracy, scale, and the interrelationships amongst elements with and nearby in relative location. Tie it back to the clients vision and the analysis of the site. Keep it brief. 5 minutes each.
- As a part of a conclusion, tie the design and patch designs together one last time.
- Be sure to highlight the phases of implementation and evaluation plan.
- Conclude with one last something that captivates the audience.
The presentations should be modeled after any paper that you would write. The intro should be catchy and have a hook. The body should be robust, well organized, and have lots of info. The conclusion wraps it up, reinforces main ideas, and leaves us feeling like we are satisfied.

The presentation format is:
Introduction (10 minutes) – Introduce your design group and orient the audience to the initial site by using the base map and other analysis tools. Then present an overview of the design that your team has created by unveiling your final design map. Please use the language of design principles and patterns to explain the design accurately.
Body (5 minutes per person) – Each team member presents a detailed design pointing out key design challenges and explaining how 3 permaculture principles have been creatively applied.
Conclusion (5 minutes) – Close the presentation with the phases of implementation and management plan.
Final Design Project Documentation Checklist
- Base Map
- Sector Analysis Overlay
- Analysis of Flow Overlay
- Elements & Functions Mind Map
- Schematic Design Map
- Habitat Defining Species List
- Project Detail Designs Visuals
- Final Design Map
- Phases of Implementation Document
Observe. Analyze. Design. Make the connections.

Final Design PDC group picture- A very happy group now that it is over
1 Comment